So this might just be my last post in this series. Why? Because this post is about those times when you feel your unofficial status as the greatest ever is challenged. Specifically, that feeling that sits in your chest when you are sure that someone’s mistake will be your official promotion to a customer. So, this is about going from Dangerously Average, to just Dangerous!
I have been keeping track for a while, and once a month, typically when sales budgets are due. It always starts the same and some hot shot Account Executive (Sales Man/Woman) gets in over their head. It often sounds like this:
Sales: The client Says they Want you to design a car.
Designer: Okay, but you know we don’t make cars right? Just license plates…
Sales: No, problem, don’t worry, I got that under control. Plus I told them we don’t make cars. BUT… our plates are so cheap that they also want us to start making cars for them AND help reduce their current supplier complexity.
Designer: Yeah, Great that makes sense. so…
Sales: Well anyway, I told them we would have a couple of concepts over to them later this week.
Designer: Great, I have a couple of quick clarifying questions:
- What will they use it for?
- How many people should it carry?
- What color do they like?
- How many doors?
- How much do they want to spend?
You know these kinds of basic questions that help dial in the design requirements. You can fill in any other questions you might want to ask about how to design a car… But these seemed logical to me at the time. So, about 2 days later most likely on a Wednesday you hear back.
Sales: Sorry, I have been traveling and chasing tail and drinking booze, er, um… I mean traveling for business. Look, good news I talked to the client and they clarified that they want a car. Something fancy like a Porche but not as high end so more eco-friendly, like a Prius. Don’t forget they need storage so I am thinking it could be like an old Dodge Rampage with a small box. Here’s the deal, the client just wants a car, something that runs, and is fine if it uses gas, or electricity, or fusion. They did not give me a budget and I am pretty sure they do have a favorite color
Like any good designer, once you are done rage crying for 30 minutes in the secret bathroom stall before you start the process of just making decisions for both the Sales and the Client. The next day you show them pictures of this monstrosity but they take a hard pass:

But by now sales guy has promised a date for the first sample, and you still don’t know what to do, so you bought an El-Camino anyway for them to look at:
Order is placed, and production begins.
Well halfway thru production the client realizes they really don’t want an automobile, but a car for a roller coaster, so they start looking for a way out of the contract.
Suddenly you find yourself realizing that besides problems with production, the client hates the project because it is not what they want, Sales is telling everyone how we are losing the project because the designer messed up the design criteria.
50 million loss for the company, total loss for you…
Never Fear just because the Account Executive will find a way to make this lost job, your last job, SolidWorks SheetMetal can make even this situation easier.
Why? Because all of the personal stuff at your desk is about to get put in a File Box you made in SolidWorks. It is really the perfect way to get out of the office and take your roller coaster development work, plus the picture of your disappointed spouse, and soon-to-be hungry kids…
Here is how to go about that, first find the “Surface” that everything will be bent from in this case the bottom of the box:
I did this as a horseshoe shape so that I could control the height, width, and depth, all from the first feature in the file:

Now I really like to keep my stuff safe, so I am going to double-wall the sides of this box. Add some hot glue and this is fully stackable! These are edge flanges off the back wall straight forward.

Next bring up the front and back walls:

Now I really like to keep my stuff safe, so in the Z-Axis, I want to have the box double walled. This will help keep the box stackable and maybe keep me warm if I have to sleep in it later.

It might be kind of hard to see, so here is the flat pattern up to this point. The front of the box thas has the “Three Panels” is the U-shape from the first step. The back row, are the other features and flanges I just added. They bend up then wrap around the base of the box. The blue tab is a “Glue” tab to help keep it all locked together. All of the bends “Fold Up”

I know this is a sad day and that every employee is the most important resource… So make sure you size the box correctly for your MVP and Team Player Trophies. Just to be safe we will add another edge flange to the front row so you can double up the bottom of the box

Now this is corrugated so I can live with some interference issues at times, but I hate that ugly mustard color. So, I went back and adjusted the sketch profile so that I would not get any errors. Rember to use that magic 1/64in for the offsets and gaps.
Well as luck would have it, I KNOW my last day will be on a rainy day, so I should account for a top lid of some sort. Plus I if I want to stack these a lid would make sense…
So back to the edge flange tool to add this top flange across the box:

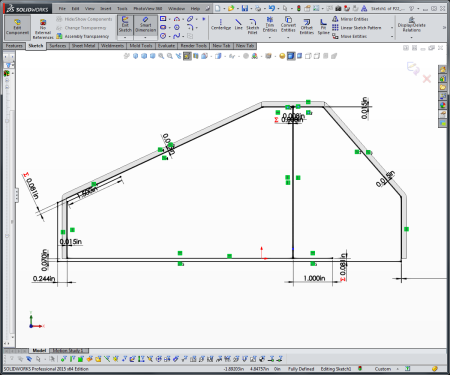
Here I have my sketch profile adjusted to keep a 1/64 (.015) offset from the edges.
The Front lip of the box will be a couple more edge flanges just follow along with the pictures and everything will be fine.

Then edit the flange with a offset so that you have some overhang:

With that you are there!

Now here I am going to do the honorable thing. I seem to be having some material interference issues with my tree, so I am going to test unfold it to make sure it all works out.

Not quite perfect but going in the right direction. Plus I think I can unfold those manually so moving on!
After folding the box back up, lets go ahead and add the side flanges to the top, and add a return back into the fold over we have on the front lip. This will strengthen it all up!

Okay we have now added all of the primary features we need to get my stuff out of the office, but I still need any easy way to go home. So, My first concern is to not let the box fall apart. I will add some locking tabs and slots to the front lip of the box like this:
Now I am actually sketching on the inside face of the flange shown here. The best way to get at this face is to create a section plane from it!

Next I need to cut out a little notch on the top that the locking tab will fit thru.

And here is that cut in the box:

I also made this cut 2-Direction so there would not be any material interference. Technically I could have cut this from the top of the box as well, but I like cutting from the side from the tab part like this:
Now we are just about there, stick with me on this as it will make sense in two pictures:

I am sketching using the same section plane as I did on the cutting of the slot.
Now remember those tabs that are called “top side tuck in” Well they don’t tuck in so well unless you adjust them, so back to the section and sketch trick to cut away some material so they actually tuck in:

And finally to get out of the building some quick get away handles here, as thru cuts thru all:

Finally seeing how this box may be my parting gift, the last thing I want are paper cuts from the sides of the box, as well as this thing to rip out on me. So, I am going to add some hand holds that are “Free” but will allow me to fold up a nice little hand hold:
So, I will first unfold the box to see if works because I am pretty nervous at this point, but also because I want to add some material back into my box.
Will it flatten?

I did go back and adjust the handholds to have a “Flap” of material in them so that the ovals would not rip out. I won’t show you to offset sketch because if you are here, you can do that on your own. But what I do want to show you is the final product:
Closed Box View:

Open Box View:

and Flat Pattern View:

So there you go, your very own personal box. I have used this design and cut boxes of extraordinary strength and useability anywhere from smaller bankers’ box size all the way up to one that was 40in X 20in X 20 for children’s dress-up clothes.
In the end use this as you may but remember to keep it Dangerously Average in your approaches!


